Sonntag, 27. Dezember 2009

Besticktes Taschentuch,Tasche uvm

Immer noch ein Klassiker ist es, der Mama oder den Trauzeugen ein hübsches Taschentuch zur Hochzeit zu schenken, mit dem sie sich die Tränchen von der rührenden Trauung weg wischen können.

Doch so ein Taschentuch allein ist doch nichts "besonderes", erst durch eine Botschaft, einen Namen, Datum, Symbol oder ähnlichen wird es zu DEM Hochzeits Give Away.

Aber so ein Taschentuch zu besticken zu lassen ist recht teuer, wie gut das es da im world wide web hilfe gibt ;)

So bin ich gestern Nacht ber diesen hübschen Blog gestolpert "Sew, Mama, Sew!" und habe ein kleines Poket Folder gefunden, welches ganz kurz die Grundlagen vom Sticken erklären. Nur das gröbste, aber für den Anfang reicht es :) Leider ist die Anleitung nur auf Englisch, denke aber das man es durch die Bilder auch so ganz gut versteht.
Finden tut "Büchlein" wie gesagt hier: Sew, Mama, Sew!

Hab euch aber hier mal direkt den Link zur Downloadseite gepostet. Viel spaß!


Bild und Anleitung von "Sew, Mama, Sew!


Ps: Für alle die bei Taschentücher als GIve Away den Kopf schütteln, natürlich lassen sich auch andere sachen auf diese Weise besticken. Zum Beispiel Taschen, T-Shirts, Unterwäsche, Kissenhüllen, Tischdecken usw.... Der Kreativität sind keine Grenzen gesetzt!


Donnerstag, 17. Dezember 2009

Verzierte Muffins (mit Rezept)

Wer liebt sie nicht, Muffins!
Und weil Sie jeder so liebt, dürfen sie bei einer Hochzeit eigentlich nicht fehlen!
Egal ob als Hochzeitskuchen Ersatz in einer extra Muffin-Etagerie oder als zusätzliche Küchlein oder aber als Highlight für die Kiddis!

Das dachte sich auch wohl meine lieblings Hochzeitszeitschrift "Weddingstyle". Dort gab es in der Ausgabe 02/06  (meine ich, muss nochmal genau nachsehen) verzierte Muffins mit Glasur und Marzipanrosen! Super simpel und super lecker!

Das wollt ich doch mal ausprobiere!
Und ich finde, das äußere Ergebnis kann sich sehen lassen, nur das innere war furchtbar! :)
Ich hab sie so lange gebacken weil ich ständig das gefühl hatte das sie noch nicht gut sind, das sie staub trocken waren... :(


Bitte entschuldigt die schlechte Bildqualität, wurde mit dem Handy gemacht. Eigentlich hab ich auch noch mehr Bilder, ich finde sie nur nicht...*überleg-überleg-überleg*

Hier mein Muffin Rezept:

120 g
Butter (weich)
80 g
Zucker

Eier 
220 g
Mehl
TL
Backpulver
ca. 125 ml
Milch
ca. 170 g
 Schokolade (in Stücken)

Backofen auf 175°C vorheizen! (bei Umluft kann ggf. was niedriger eingestellt werden)
Förmchen einfetten
Die weiche Butter mit dem Zuckern zu einer cremigen Masse rühren, dann die 2 Eier nacheinander unterrühren. Nun wird das Backpulver ins Mehl geschüttet und vermischt. Anschließend das Mehl (mit Backpulver) und die Milch, abwechselnd, langsam in die Butter-Zuckermasse unterrühren.


Zum Schluss die Form mit Teig füllen und ein Stück Schoki reinstecken.
Achtung: Nicht zu viel Teig in die Form geben, der Muffin wird ja hoch!

Portionen: ca. 12
Backzeit: ca. 20 min ;)

Ich wünsche süßen Appetit.


Ps: Demnächst werd ich davon ein Tutorial hier präsentieren

Samstag, 12. Dezember 2009

Land/Bauernhochzeit - Erntedanktisch

Ok, ich geb zu! Es ist ein bisschen, reichlich spät, für Erntedankttisch Bilder und was um Himmelswillen hat das mit Hochzeit zu tun???...

Erstmal zu meiner Verteidigung: Besser spät als NIE ;)

Zudem möchte ich hier einfach mal zeigen, wie man aus einfachen Lebensmitteln, ein paar Blumen, ein bisschen Heu und ein paar passenden Accessoires eine wunderschöne ländliche Bauernhochzeit darstellen kann.


Freitag, 11. Dezember 2009

Pimp my Näh-Sklaven - Umlackieren einer Nähmaschine

Hallo ihr da draußen,
heute möchte ich Euch mal diejenige Vorstellen, welche die ganze Arbeit für meine "Drunerbunts" erledigt ;)

Meinen Nähsklaven "Bambi" :D

Bambi habe ich von meiner lieben Mama, für meine Näherei geschenkt bekommen und Sie stammt wohl noch aus DDR-Zeiten :)
Unglaublich Häßlich, unglaublch schwer ABER sie läuft!!!

Doch das mit der Optik war halt so eine sache....
Als Frau dürfen Sachen eben nicht einfach NUR Praktisch sein, auch wenn das die Begründung für sämtliche EInkäufe gilt ;)
Da bin ich auf die gloreiche Idee gekommen, ich könnte sie (Bambi) doch einfach umlackieren :)))
Gesagt getan!

Als 1. hab ich mir die Nähmaschine genau angeschaut, wo überall Farbe hin kommen könnte, was kann ich abschrauben etc.


Dann habe ich vorsichtig alles mit einem breiten Klebeband abgeklebt.


 So nachden ich dies in aller gründlichkeit getan habe, habe ich begonnen langsam und gleichmäßig die Nähmaschine von alles Seiten mit dem Sprühlack enzunebeln.


Dann nur noch über Nacht trocknen lassen und fertig!!!


Und weil mir das so gefällt und so einfach st, wird sie nochmal umlakiert und zwar in lila oder rosa :))) (So sollte sie von anfang an sein, aber ich hatte keinen Sprühlack in den Farben bekommen)

Tpp:
Wenn mal kann man jetzt noch hingehen und mit Lackstiften sachen drauf malen. Z.B Blumen oder ein Rehkitz (werd ich machen) oder eine rote Nähmaschmine mit weißen Punkten drauf. Das säh mt sicherheit genial aus!!!

Wenn das hier jemand nachmacht, würd ich mch riesig über Fotos eures Werks freuen!!!


Donnerstag, 10. Dezember 2009

Frostige Schneeflocken am Fenster eurer Location

Ein RIESEN spaß!!! (und sauerei ;) )

Vor einiger Zeit habe ich in einem Buch gelesen, wie man frotige Rosen macht.
Diese Eiweiß-Zucker-Technik hat mich richtig fasziniert. Was man damit alles erfrieren lassen kann...traumhaft!
Und was gibt es schöneres, wenn zur Winter-Weihnachtszeit alles glitzernd und frostig erscheint?

Diese sehr einfache und vorallem kostengünstige Dekoidee ist ideal für Winterhochzeiten, welche in schlichten Locations (Gemeindehallen, Turnhallen, Scheuenen etc.) gefeiert wird. Denn die Fenster lenken wunderbar ab und zaubern eine herrliche Winter-Weihnchtsstimmung!
Anleitung:
Das Eiweiß als Basis ans Fenster zu bekommen war nicht schwer, einfach EIweiß in ein Schälchen geben, nicht zu dicken Pinsel auswählen und auf die Fensterscheibe pinseln.
Den Zucker ans Fenster zu bekommen, gestaltet sich hingegen recht "schwierig"????
Von oben runter rieseln lassen funktioniert nicht, also nicht lange überlegt, Hand in den Zucker gesteckt und einfach geworfen :)))))

Ich sag euch, es war eine riesen sauerei, überall knirschte es und war Zucker verstreut aber es hat ein heiden spaß gemacht!!!
Mit Kindern stell ich mir das ganze richtig lustig vor ;))))) Vorallem wenn sie das dann anschließend an Ostern oder im Sommer mal machen wollen und einfach den Zucker nehmen und gegens Fenster werfen...hahahaa

Allerdings ist der erzielte Effekt mit nichts was aus der Dose kommt zu toppen!
Aber seht selbst


Ps: Da es wie bereits erwähnt wirklich ziemlich viel schmutz macht und die Fenster anschließend wieder geputzt werden müssen, klärt diese Dekoidee bitte vorher mit Eurer Location ab!


Liddy

Montag, 26. Oktober 2009

Hochzeitslogo als Wandtattoo selbstgestalten

Hallo meine lieben Bräute,
immer mehr Brautpaare haben die sogenannten "Hochzeitslogos" für sich entdeckt.
Häufig sind es die Initialen des Brautpaares, welche als Monogramme kunstvoll zu einem Logo zusammengefügt werden. Oder aber es ist ein Bild, ein Symbol welches das Brautpaar miteinander verbindet.

Solch ein Hochzeitlogo ist meiner Meinung nach, nicht etwas, was nach der Hochzeit auf nimmer Wiedersehen in der "Hochzeits-Erinnerungsbox" verschwinden muss.

Warum nicht das Hochzeitslogo als Bild/Tattoo auf eine Wand in der Wohnung zeichen. So wird man immer an diesen einen wundervollen Tag im Leben erinnert und vielleicht sogar verhilft es nach so manchem Streit, schneller zur Versöhnung, da man sich an das erinnert, weshalb man seine Frau/Mann geheiratet hat.

In einem Tutorial habe ich allerdings ein anders Bild verwendet, aber am Prinzip ändert sich ja nichts ;)


Material:
  • Wunschbild
  • Folie
  • wischfesten Schreibstift
  • OVP/Polilux (oder ähnliches)
  • Darbe (ich hab einfach Acrylfarbe verwendet)
  • Pinsel
  • Bleistift

Schritt 1
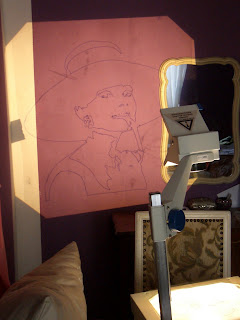
Als erstes habe ich mein Wunschbild, in dem Fall das von Audrey Hepburn, ausgedruckt. Dann habe ich die Folie genommen, es über das Bild gelegt und auf der Rückseite beides zusammen mit Klebestreifen festgeklebt. So verrutsch mir das Bild beim abzeichnen nicht.


und abzeichnen


Schritt 2
Nachdem ich nun das gesamte Bild auf die Folie abgepaust habe, lege ich die Folie auf den OVP ubd richte ea auf die Wand wo ich das Bild haben möchte.

und zeichne die Konturen des Bildes mit dem Bleistift nach. Ich rate jedem dazu, denn der OVP je nachdem wo er steht, hat nicht immer die exakt gleiche Position und dann wird das Bild verzerrt. Dann anfangen die mit Bleistift gezogenen Konturen mit dem Pinsel vorsichtig nachfahren.


und dann nur noch ausmalen ;)


Donnerstag, 25. Juni 2009

Meine Brautfrisur zur Standesamtlichen -In 5 Schritten zur Brautfrisur

In 5 Schritten zur Brautfrisur

1. Als erstes habe ich mir meine Haare lockig geföhnt mit VIEL Haargel. Wenn ihr keine eignen Locken habt, empfehle ich euch zum Lockenstab zu greifen oder Papilotten oder Lockenwickler rein zu drehen.

2. Anschließend habe ich meinen Kopf nach hinten gehalten und angefangen wild Haarklammern reinzustecken (sie werden mit der geschlossenen Seite nach unten hin reingeschoben und dann nach oben rein gesteckt, hoffe ihr habt das verstanden) bis ich den ersten halt hatte.

3. Nun habe ich meine selbstgebasteltes Didadem auf den Kopf gelegt und unter dem "Dut" festgeknotet. Dabei habe ich darauf geachtet, dass vor den Ohren noch Haare waren, denn ich wollte diese nach innen drehen, so das das Satainband quasi im Haar verschwindet.

4. Nachdem das Diadem festsaß und zusätzlich noch mit Schiefspängchen gefestigt wurde. Habe ich erneut meinen Dut mit Haarklammern festgesteckt. Nun habe ich aber etwas mehr Form rein gebracht und vereinzelnt Locken geformt, soweit man das eben kann.

5. Zum Schluss Tonnen Haarspray. FERTIG!


Sonntag, 10. Mai 2009

Brooch Bracelet

DIY Wedding Challenge: Brooch Bracelet article photo

When I first saw Dana Saylor's creations on PW, I will admit I wanted to jump right on the bandwagon.  However, once I saw the price tag on those beauties, I thought "Hey I can make my own!"  And I did!


Supplies:
  • vintage brooch
  • pearl beads in size 6mm and 8mm(you can get 4 mm beads as well if you want 5 strands)
  • rondelles in sizes 6mm and 8mm
  • clear beading wire
  • silver crimps
  • jewelry long nose pliers
  • one multi-strand clasp (3 strand in my case)

Directions:
1) Cut a long piece of beading wire (longer than the circumference of your wrist--you will cut it down later)
2) Attach it to one side of the brooch by looping it through a crimp bead, then through a middle opening on the brooch and then threading it through the crimp bead again.  Take your pliers and set the crimp bead in place by squeezing it flat.
3) Repeat step 2 twice.  Once on an opening above the middle and once on an opening below.
4) Now repeat steps 2 and 3 on the other side.
5) Now you're ready to start beading.  Start with the middle strand.  You will use the larger pearl beads (size 8mm) here.  Thread one pearl bead through the wire and follow it with a rondelle.  Now bead two pearl beads and follow those with a rondelle.  Continue alternating two pearl beads and one rondelle until the strand reaches about halfway around your wrist.
6) For the next two strands on either side of the larger beads, you will use the next size down (size 6mm).  You want to make sure your rondelles alternate with the middle strand.  Use 3 pearl beads followed by a rondelle.  Continue that pattern until it reaches the length of the middle strand.
7) Now repeat steps 5 and 6 on the other side of the brooch.
8) You may have to play around with the length of both sides to ensure proper fitting around your wrist.  Once you are happy with the lengths, you are now ready to attach your clasp.
9) Thread your wire through a crimp bead then through the corresponding loop on the clasp.  Finally thread the end of the wire through the crimp bead again and close it with your pliers.
10) Repeat step 9 for all strands.


Queele: http://www.projectwedding.com/wiki/show/diy-wedding-challenge-brooch-bracelet

Samstag, 9. Mai 2009

Hochzeits Haarclip

Materials:
  • silk flower (mine is a peony-type)
  • feathers (optional)
  • fabric glue
  • small styrofoam ball, about 2" (I recommend using 'smoothfoam', which is more solid and is stronger than regular styrofoam)
  • Swarovski crystal beads or glass beads
  • faux pearl beads
  • flat-head straight pins (look in the jewelry aisle, they look just like sewing straight pins, but have a flat head on the top)
  • alligator hair clip
Instructions:

Remove the flower from the stem. If your flower is almost the size of your head like mine was, remove a few of the outer petals to make it smaller. Also remove any plastic pieces from the center of the flower. Glue the petals back together on top of each other, layering them by size.

If you're using feathers, trim them down to your desired size (longer for more feather goodness, shorter if you want them to be subtle) and glue them to the backside of the flower.

Then you can add the alligator clip on top of the feathers. I made sure the clip I bought had a large, flat surface so I could glue it to the flower.

While the feathers and clip dry, start working on the inside. Take one of the small styrofoam balls and cut in in half. Take a bead and thread it onto a flat-head pin. Cut the pin to a shorter length so it will stick into the half-sphere, but not out of the other side. Dip the pin in the fabric glue to ensure it stays put once you've stuck it into the ball.

Start arranging the beads in random order (or you can make a pattern if you like) by sticking them into the styrofoam. This will give you a 3-dimensional look once you add it to the center of the flower, which really shows off the sparkle.

Once you've covered the styrofoam, add a generous amount of glue to the bottom of the beaded ball, and stick it in the center of your flower.

And there you have it! A custom-made, one of a kind hair flower for under $20.00. Have fun with it...change the bead or feather colors to match your wedding colors, or even do a colored flower.
For more DIY projects, visit my blog!


Quelle: http://www.projectwedding.com/wiki/show/diy-hair-flower and http://www.withthisringwedding.blogspot.com/

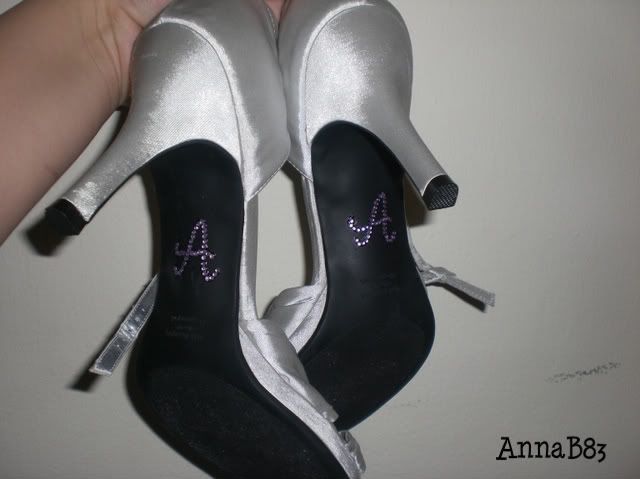
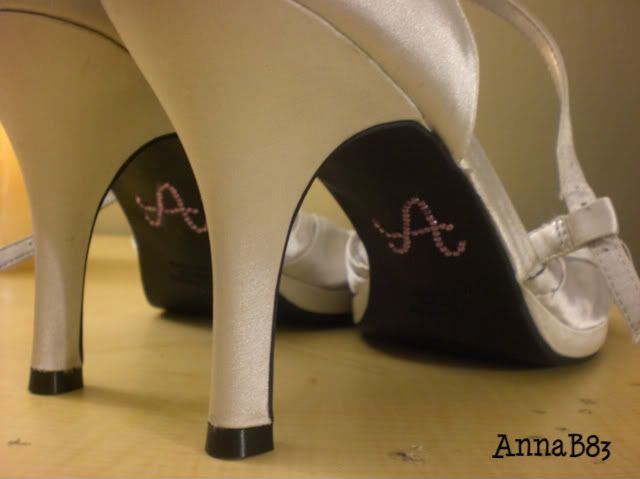
Bridal Shoes Letter Bling

Step-by-step instructions on how to put rhinestones on the undersides of your bridal shoes with your initials for the big day!
DIY Wedding Challenge: Bridal Shoes Letter Bling article photo Shoes, Rhinestones, Lilac
photo by: AnnaB83
I saw a couple pictures of blinging up the bridal shoes with the initials of the bridal and groom, and I couldn't help myself from doing another DIY project! I wish I could have a little diversity, but our names are "Anna" and "Andre" so I'm stuck with "A" and "A."  I suppose you could do your own initials or your new initials after you'll be married, but I wanted it to be the two of us :)
I saw the pics, but didn't know how it was done, so I came up with my own method and it worked beautifully!
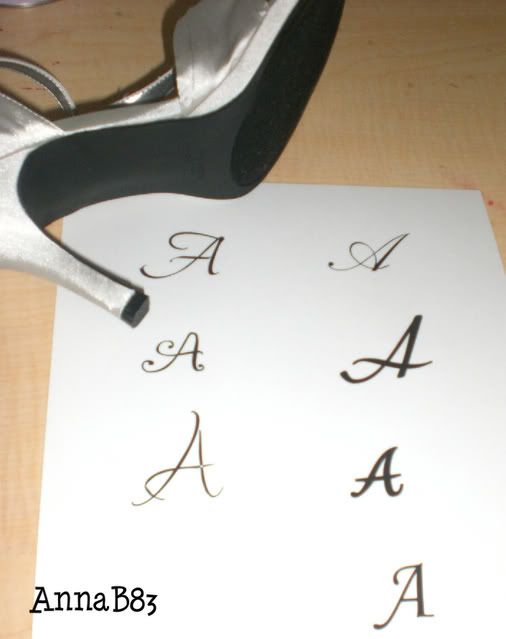
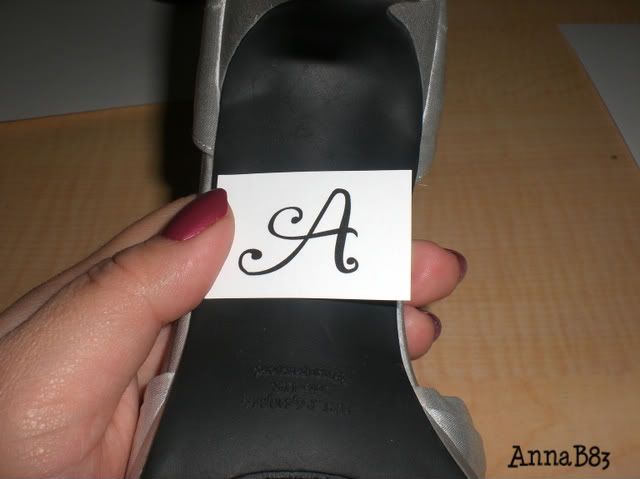
First, I printed an "A" in a few of my favorite fonts to test out which one I'd like best. I cut them into little squares and decided on what I liked best...then I printed out different sizes of the chosen font to see what would be the best fit.


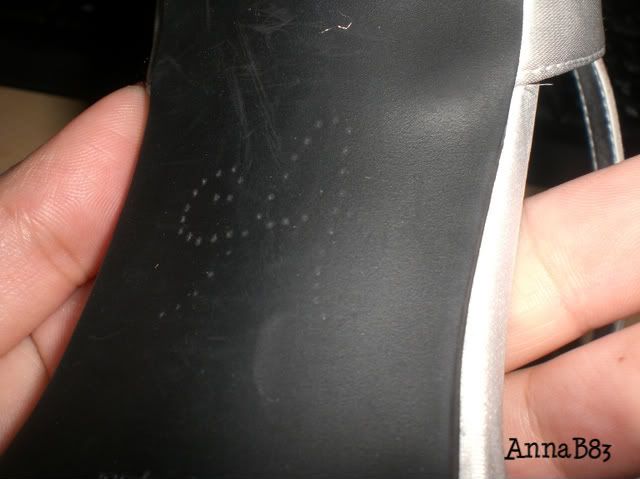
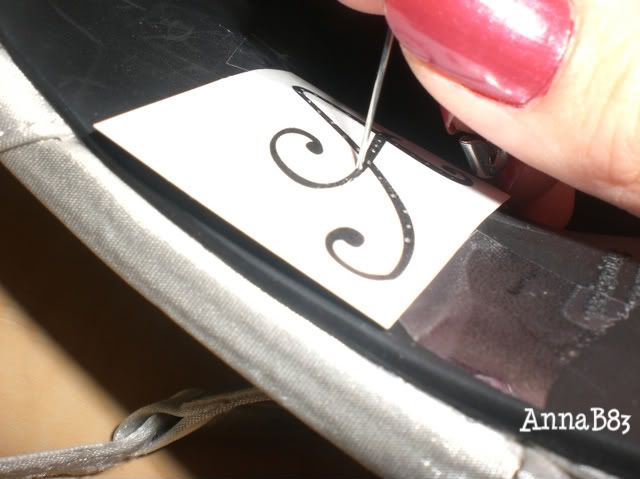
Next, I taped the square onto the shoe and used a safety pin to poke holes to trace the letter onto the rubber sole. Once I peeled the paper off, there was a faint outline of the letter (so I don't have to worry about a glue mistake doing it freehand).


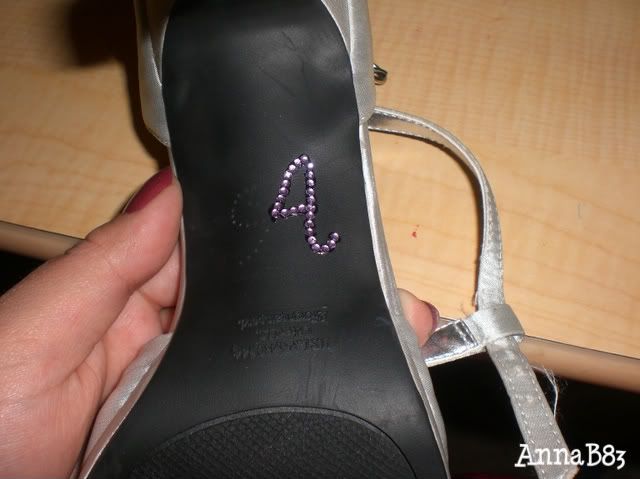
Then, I traced a little part of the outline with clear nail polish (actually it was nail hardener so I don't know if that made a difference but its STRONG!). I took some tweezers and one by one put the little lilac rhinestones on along the nail polish.  After it dried, you could no longer see the nail polish.

I decided not to do the little loopy thing at the end because I wanted to hang on to a few extra rhinestones just in case a couple fall out before the wedding (since I still have 5 months to go and a few more fittings). I like them the way they are, but still might finish that little loop at the end. If not, the pin pricks don't show up...only at a certain angle in the light.


Quelle: http://www.projectwedding.com/wiki/show/bridal-shoe-bling
Freie Übersetzung folgt

Sonntag, 3. Mai 2009

Bridal Party Survival Kit


While we would hope that one's wedding day would be perfect in every way, there are bound to be a few snags here and there. Your maid-of-honor gets a blister from her new high heels, one of your bridesmaids comes down with a headache due to a few too many glasses of wine at the rehearsal dinner the night before, and another bridesmaid dribbles a bit of her shrimp cocktail sauce on her mint colored dress. Thankfully, you thought ahead and prepared a cute survival kit for them.
Aspirin, band-aids, spot remover, breath mints and tissues are all good items to include to help your maids through the long day, so they can focus on what really matters: you and your groom.
survival
Jillian came up with this cute idea you can make WAY ahead of time and pass out to your ladies before the wedding.
All you have to do is create a label (or use our templates), print, cut it out, fill your cellophane bag and staple the label over the top. Sooo easy.
Bridal Party Survival Kit Templates
Have a fun weekend everyone. We're working on a bunch of good posts for next week.

Link: http://100layercake.com/blog/archives/520

Mittwoch, 1. April 2009

CD Etikett (Label, Cover)

Es ist wirklich furchtbar. Je länger man seine Hochzeit plant um so mehr tolle ideen bekommt man.
Nicht nur das ich unsere komplette Papiere über den haufen geworfen habe, nein, ich muss immer alles neu und nochmal und noch besser machen.
So auch unsere CD Etiketten.
Hab jetzt mal 3 stück gebastelt, bin mal gespannt welches euch am besten gefällt :)


Montag, 30. März 2009

Verpackungen basteln

Hi,
und wieder ein tollen link gefunden!

Hier sind jede menge Anleitungen wie man sich selbst Geschenkeboxen, Verpackungsbox etc. basteln kann.

Viel spaß

Anleitungen zu den Boxen

Sonntag, 29. März 2009

Kirchenheft

Hallo liebe Bräute,
ein Kirchenheft muss nicht immer s/w Kopiertes und einmal gewalztes Papier sein. :)

Man kann auch sehr kostengünstig mit ein bisschen Handarbeit wunderschöne individuelle und persönliche Kirchenhefte basteln.

Wieder einmal unseres als Beispiel: